Introduction
I was delighted to have the chance to share my experiences with the Model Context Protocol and working with local open-weight models in front of such a large group of engaged developers at the NOI Techpark South Tyrol as part of the Software Developers Thursday. It was a real pleasure, and I hope this article can give everyone who attended the talk a few extra insights to build on. For those who couldn’t make it, I’ve tried to explain everything here at a pace that lets you follow along in detail. Thanks for reading!
Goal of this Post
Local Large language models (LLMs) are now mature enough that you don’t have to be a full‑time machine‑learning engineer to get value from them. Open‑source frameworks such as Ollama and Open WebUI make it possible to run high‑quality models locally, and the Model Context Protocol (MCP) standard provides a bridge between your local model and external data sources, tools or APIs. My goal in this post is to give you a complete roadmap: set up a local LLM environment, choose the right model for your hardware and use‑case, and then connect that model to the outside world via MCP. By the end, you should have a robust local AI system that you understand well enough to customize and extend.
Setup for Local LLM usage
Running LLMs locally gives you full control over your data, no network latency, and predictable costs. In my experience the combination of Ollama for model hosting and Open WebUI for a web‑based interface strikes a nice balance between simplicity and power.
Ollama
Ollama wraps the high‑performance llama.cpp inference engine in a Go‑based server and CLI, exposing a simple HTTP API. It’s easy to install, even if you’re not a seasoned Go developer. On Linux, the recommended installation uses a one‑line shell script from the official site:
curl -fsSL https://ollama.com/install.sh | shThe installer downloads the latest release and configures the ollama binary. If you prefer manual installation, download the .tgz archive from the release page, extract it into /usr/local and start the service manually with ollama serve. Windows and macOS packages are available on the website. After installation, running ollama serve starts a background HTTP server on port 11434, commands like ollama run llama3.1 simply send HTTP requests to this service.
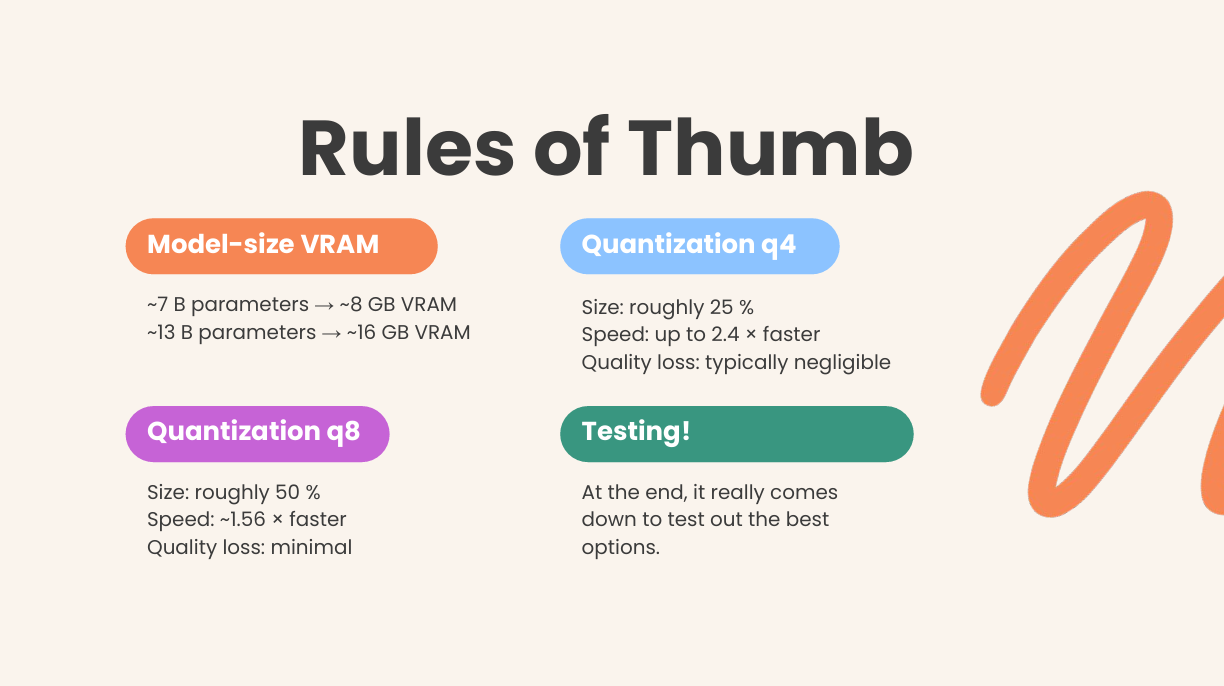
Ollama also publishes model packages. A 7‑billion‑parameter model typically needs at least 8 GB of RAM, and a 13‑billion‑parameter model requires about 16 GB.
Smaller GPUs with 16 GB of VRAM can therefore handle 7–13 B models by using the quantized builds available through Ollama. Models are stored in the efficient GGUF format and loaded into llama.cpp for inference. Because Ollama exposes a REST API, you can integrate it into scripts or other UIs without learning a new protocol.
Another advantage of Ollama is its permissive MIT license: the project’s license file states that you may redistribute and modify the software as long as you include the original license and copyright notice. This makes Ollama easy to embed in your own projects.
Why I like it: I’ve been running Ollama since its early releases, and it has consistently stayed ahead of major platform shifts. When multimodal models appeared, the developers added built‑in support; when new quantization schemes arrived, they were integrated promptly. The tool shields you from the complexity of C/C++ inference (because all the low‑level work happens in llama.cpp) while keeping things transparent. In practice you install once, update occasionally, and the models just work.
Running the service
After installation, start the service in one terminal:
ollama serve
Then, from another terminal or via API, run a model:
ollama run llama3.1
Behind the scenes ollama run sends an HTTP request to localhost:11434 and streams responses. Because the API is simple JSON over HTTP, you can build your own integrations or use web‑based front ends like Open WebUI.
Open WebUI
Open WebUI (previously called Ollama WebUI) is a feature‑rich web interface that sits on top of Ollama (and other OpenAI‑compatible APIs). It’s designed for everyday developers who want a “ChatGPT‑like” experience locally. Installation options are flexible:
- pip installation: If you already have Python 3.11, you can install the server with
pip install open‑webuiand launch it viaopen-webui serve. This command starts a web server on port8080. Details here. - Docker: For an isolated deployment run
docker runwith the official image. The default configuration connects automatically to a local Ollama instance. For example, to run with a bundled Ollama in one container and expose the UI on port 3000:
The project documentation provides alternative commands for GPU usage or connecting to a remote Ollama serverdocker run -d -p 3000:8080 -v ollama:/root/.ollama -v open-webui:/app/backend/data \ --name open-webui --restart always ghcr.io/open-webui/open-webui:ollama - Kubernetes and Helm: There are official charts and Kustomize manifests for more complex deployments, see: docs.openwebui.com.
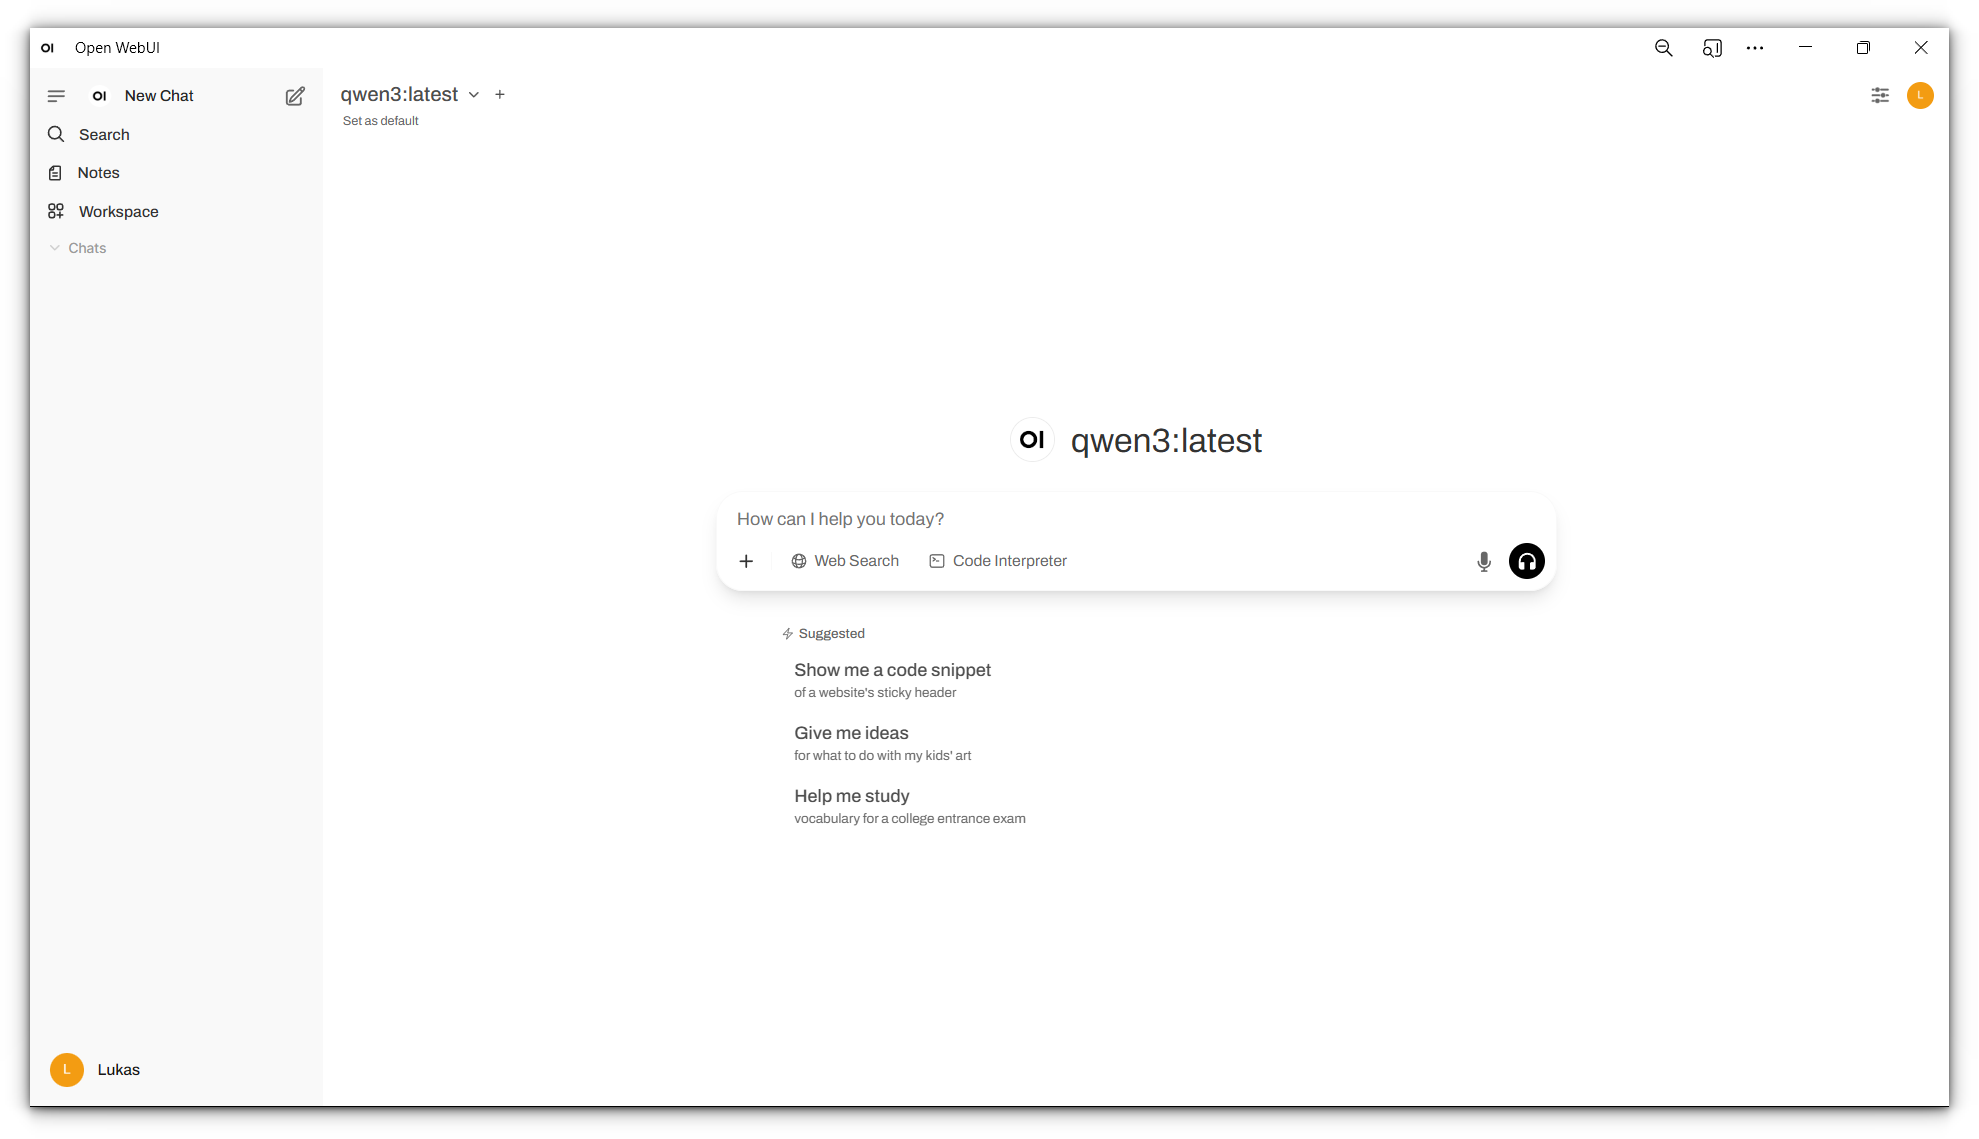
When you first access the WebUI you’ll create an admin account. The UI immediately detects a running Ollama service and lists available models. If the connection fails, navigate to Admin Settings → Connections → Ollama and provide the base URL (for example http://localhost:11434).
Key features
The official documentation positions Open WebUI as more than a simple chat UI. Some of the highlights include:
-
Unified workspace: Manage models, prompts, documents and tools in one interface. Conversations can be organized into folders and tagged; folders can store custom system prompts and attach knowledge bases so that every chat created within inherits context.
-
Prompt templates: A dedicated Prompts section lets you create reusable prompts with slash‑command shortcuts. Prompts can include system variables (current date, user name, etc.) and custom input variables that open a form when triggered. This makes it easy to build structured workflows e.g., “/summarize” or “/draft‑email”.
-
Chat history management: Open WebUI offers rich history and archive features. You can revisit regeneration history, archive old chats, export conversations as JSON/PDF/TXT, import or export bulk chat history, and even delete all chats for a fresh start. This gives you fine control over your conversation data.
-
Document and web integration: Built‑in Retrieval‑Augmented Generation (RAG) allows you to upload PDFs and other documents, referencing them in chat is as simple as typing
#documentName. A web‑search function can fetch pages on demand, and there is support for image generation, voice input, and video calls. -
Pipelines and tools: Open WebUI includes a plugin framework for pipelines. You can upload Python scripts that run inside the UI and expose functions to your model, similar to OpenAI function calling. This is essential for the MCP section later.
Unlike Ollama, Open WebUI is not licensed under MIT. Its license is a BSD‑3–style license with additional branding restrictions: the project allows redistribution and modification, but you may not remove or alter the “Open WebUI” branding unless you have fewer than 50 users or obtain permission. Keep this in mind if you plan to white‑label the interface.
Why use Open WebUI?
While you can interact with Ollama via curl or your own scripts, a web UI dramatically improves usability: you get chat history, conversation organization, RAG integration, voice and video capabilities and crucially MCP integration (discussed later). For me, Open WebUI is the everyday workspace for local LLM experiments.
Find the best model for a use‑case
Choosing the right model is not about picking whatever is popular in a blog post. Instead, you should rely on reputable evaluations and align the model’s requirements with your hardware.
Use leaderboards to assess quality
Chatbot Arena and related leader boards provide crowd sourced and benchmark‑based scores for open LLMs. The Big Benchmarks Collection on Hugging Face is a collection of tables ranking models by different metrics. Some common are:
- Chatbot Arena: A human‑in‑the‑loop tournament where models duel in blind A/B tests to produce Elo ratings.
- MT‑Bench: A set of multi‑turn conversation tasks graded automatically by GPT‑4, focusing on chat quality.
- MMLU (5‑shot): A multiple‑choice test covering 57 subjects; it evaluates broad knowledge.
When evaluating a model for your own use‑case:
- Filter by model size and hardware needs. A 7 B parameter model usually fits in 8 GB of RAM; 13 B models need around 16 GB. Many consumer GPUs have 16 GB of VRAM, so stick with models in the 7 B–13 B range or use quantized versions.
- Examine ranking metrics. Higher Arena Elo indicates better subjective chat quality. MT‑Bench emphasises multi‑turn coherence, and MMLU measures factual knowledge. Depending on your task, coding, summarization, Q&A, some metrics matter more than others. Don’t pick solely based on overall rank.
- Consider license and community support. Some models impose commercial restrictions; others, like Llama 3, use a permissive license. Check the repository and license file before committing.
- Stay up to date. The open‑source LLM landscape changes quickly. Leaderboard scores from early 2024 may not represent the best models in mid‑2025. Always check the latest leaderboard data.
- Testing your favorites. Because at the very end the model must fit your use case and more often then not benchmarks are only a indicator so downloading some potential candidates through Ollama and testing it will be needed.
Quantization: fitting big models into small hardware
Most consumer GPUs cannot load 70 B models at full precision. Quantization reduces the number of bits used to represent each parameter so that large models fit into memory with minimal performance loss. A 4‑bit quantized model uses one quarter of the memory of its FP16 counterpart. Academic evaluations show that 4‑bit quantization retains accuracy close to the original model, although inference may slow down and specialised kernels are needed. Recent engineering efforts such as AWQ (Activation‑aware Weight Quantization) and SmoothQuant offer practical speedups:
- Converting models to 4‑bit precision shrinks size by ~75 % and can speed up inference by up to 2.4×.
- AWQ further reduces memory usage four‑fold and speeds up token generation 3–4×, with negligible accuracy loss.
- SmoothQuant’s 8‑bit quantization halves memory usage and gives around 1.56× speed improvement.
- Benchmarks on modern models like Deepseek R1 show that INT8 quantization yields a model roughly 2× smaller with high quality, while INT4 yields a 4× smaller model with slight quality drop.
Ollama offers pre‑quantized versions of many models. When pulling a model, it is likely already quantized but if you want a specific quantization check on the models page the names as usually there is a qx where x is the bits used for quantisation. for your local setup, start with 4‑bit or 8‑bit quantized models and evaluate their quality.
Putting it all together
To find a model for, say, summarising articles on a 16 GB GPU, I would:
- Check the Open LLM Leaderboard and note which 7 B–13 B models score well on Arena and MT‑Bench for summarization tasks.
- Pull a quantized variant through Ollama and test on a few documents using Open WebUI’s interface.
- Compare responses with a second model (perhaps a 13 B model if memory allows). Use Open WebUI’s Model Evaluation Arena or simple A/B testing in different chats.
- Weigh quality against latency. If the 13 B model is noticeably better but too slow, try a different quantization method (AWQ vs. SmoothQuant) or a smaller model with better instructions tuning. The beauty of local LLMs is that you can iterate quickly.
MCP
The Model Context Protocol (MCP) was announced by Anthropic in November 2024 to address a very real problem: large‑language models can respond to natural‑language requests, but they cannot see your files, call APIs or manipulate applications without bespoke integrations. MCP proposes an open standard for connecting AI applications to external data sources and tools, much like USB‑C connects devices to peripherals In the MCP architecture three roles participate in every connection:
- MCP host – the AI application (e.g., Claude Desktop, VS Code or a chatbot like our Open WebUI instance) that manages one or more MCP clients.
- MCP client – a protocol component within the host that maintains a connection to one MCP server.
- MCP server – a program that exposes data and functionality (tools, resources and prompts) to clients.

This client–server architecture is encapsulated in two layers:
-
Data layer – defines the JSON‑RPC 2.0 protocol used for requests and responsesmodelcontextprotocol.io. The data layer standardises lifecycle management, capability negotiation and core primitives such as tools, resources and prompts. It includes methods for discovery (
*/list), retrieval (*/get,resources/read), execution (tools/call) and notifications. -
Transport layer – specifies how clients and servers communicate. MCP supports two transports: stdio (bidirectional communication over the process’s standard input/output) and streamable HTTP, which uses HTTP POST and server‑sent events to allow remote serversmodelcontextprotocol.io. A negotiation handshake (
initialize) exchanges the protocol version, the capabilities each side supports and identification information.
MCP primitives
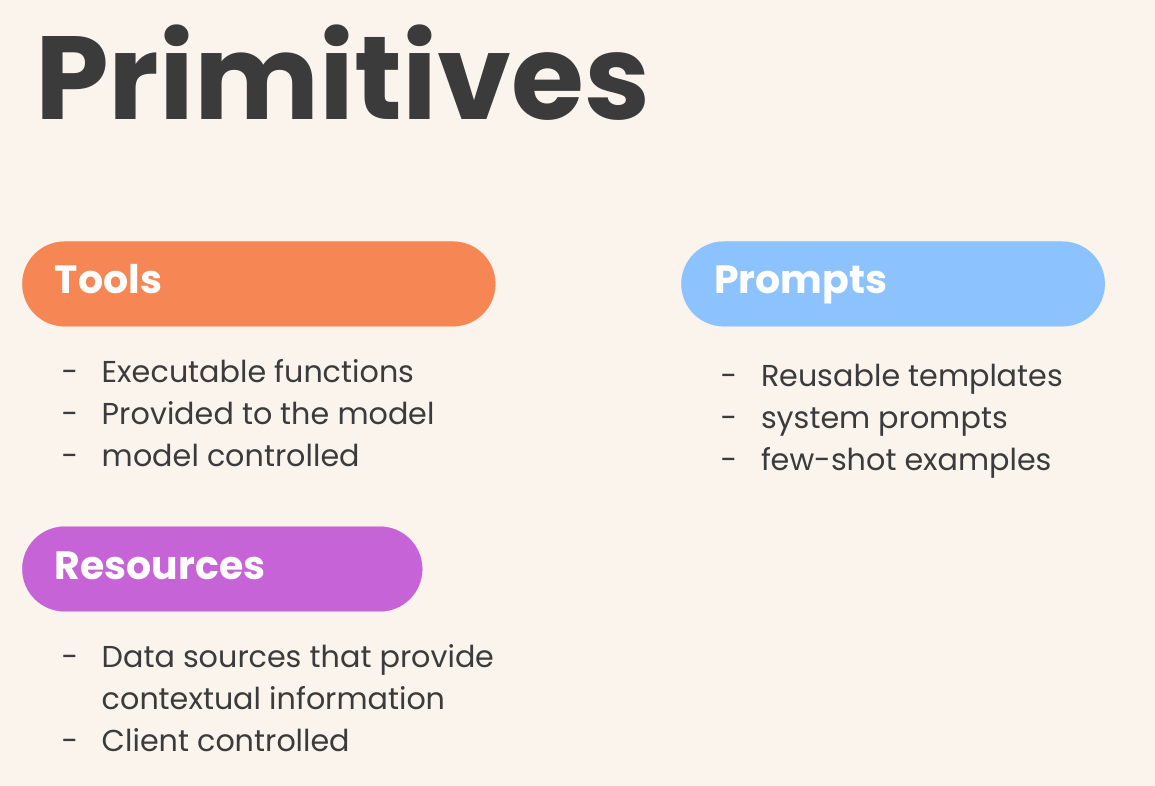
MCP servers provide functionality through three primitives
-
Tools: Functions that the language model can invoke to perform actions—search for flights, create calendar events or call APIs. Each tool has a name, a human‑readable description and an input schema. Clients discover tools via
tools/listand execute them withtools/call. The specification emphasises human‑in‑the‑loop approval: applications should display available tools and require explicit confirmation before executing them. -
Resources: Data sources that the host can read and provide to the model. Resources have URIs and MIME types; servers expose them via
resources/listandresources/readmodelcontextprotocol.io. Resource templates allow parameterised access to structured data (e.g.,travel://activities/{city}/{category}). -
Prompts: Reusable templates that help structure interactions with language models. They can encapsulate system prompts, few‑shot examples or domain‑specific instructions. Clients list and fetch prompts similarly to tools and resources.
MCP clients can also expose primitives back to servers. Sampling allows a server to ask the host’s model to generate a completion (useful when the server doesn’t embed an LLM). Elicitation lets a server request additional user input; the client should display the request and allow the user to approve or deny it. Logging provides structured log messages to assist debugging.
Lifecycle example
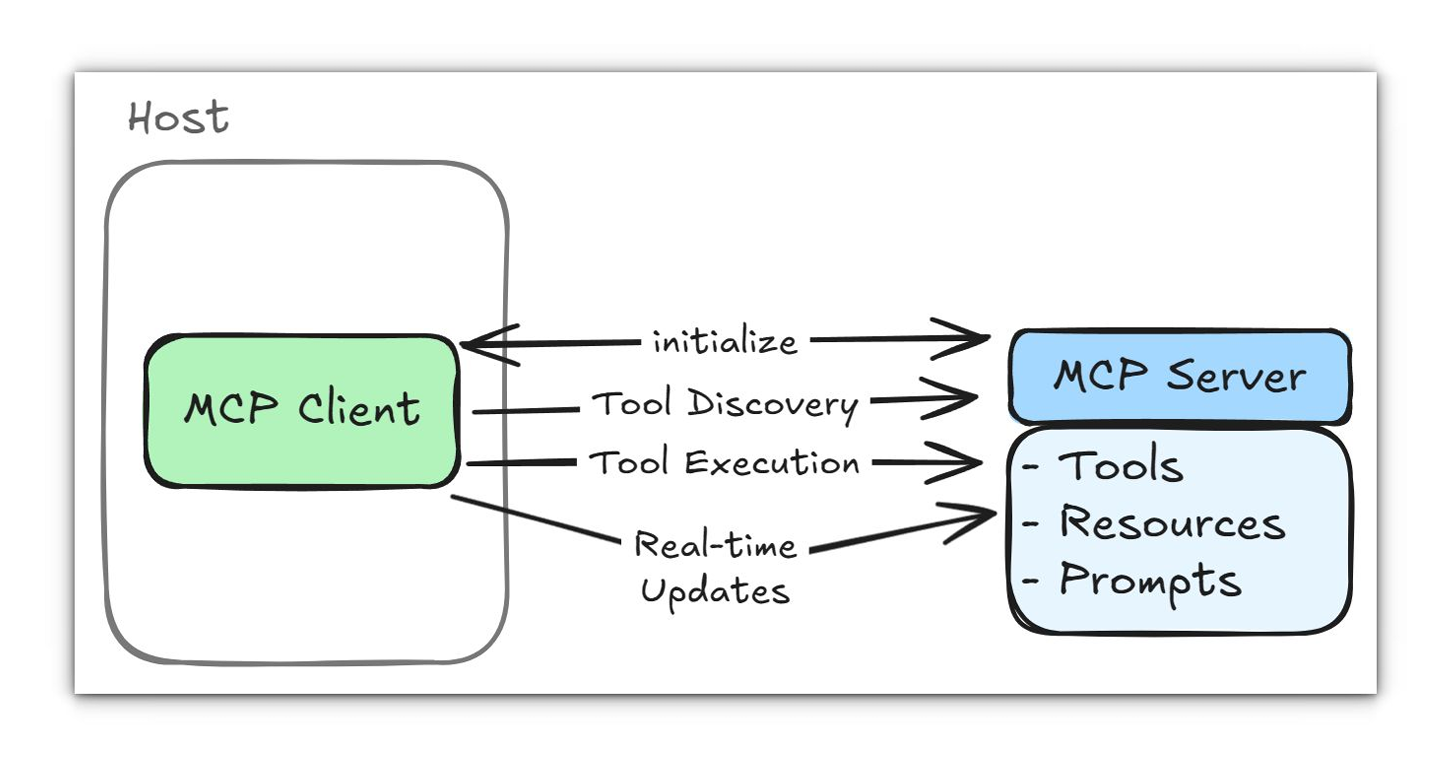
A typical interaction starts with the host creating an MCP client for a server. The client sends an initialize message with the protocol version, capabilities and client info; the server responds with its capabilities and sends a notifications/initialized notification. After initialization the client can list tools:
{ "jsonrpc": "2.0", "id": 1, "method": "tools/list" }The server returns an array of available tools, each with a name, description and input schema. When the model’s reasoning suggests using a tool, the host sends tools/call with the tool name and arguments. The server executes the operation—often requiring user approval—and returns structured results.
In effect, MCP provides a generic, secure bridge that hides low‑level transport details and gives AI models a structured view of external capabilities. As the spec notes, it is “a standardized way to connect AI models to different data sources and tools”, similar to how USB‑C standardised hardware connections.
Host & Connect to external MCP server
Running your own MCP server is only the first step; you also need a client capable of talking to it. Open WebUI supports tool servers using the OpenAPI format. Because most MCP servers communicate over stdio or streamable HTTP, the Open WebUI team provides mcpo, a proxy that wraps an MCP server and exposes it as a REST‑style OpenAPI service. This proxy solves several problems: stdio is inherently local and insecure over the network, and native MCP does not provide API documentation or authentication. mcpo automatically generates OpenAPI documentation, adds HTTP authentication and wraps tool calls in secure, scalable endpoints. See all details here: docs.openwebui.com.
Running mcpo
To expose an MCP server via HTTP you install mcpo (via uvx mcpo or pip install mcpo) and run it with your server command. For example, if you have a time‑server written in Python you can run:
uvx mcpo --port 8000 -- uvx mcp-server-time --local-timezone=Europe/Berlinmcpo launches the MCP server and generates OpenAPI documentation at http://localhost:8000/docs. It can also proxy remote servers that use the streamable‑HTTP transport by specifying the server type and URL. Using a configuration file you can expose multiple MCP servers under different paths; each tool is mounted under its own route (for example, /time or /memory).
Connecting to Open WebUI

After mcpo is running, connect it to Open WebUI via the Settings menu. Under ➕ Tools add the full URL to a tool path e.g., http://localhost:8000/time Open WebUI distinguishes between User Tool Servers (requests made from your browser) and Global Tool Servers (requests made from the backend). Use a User Tool Server when the MCP server runs on your local machine; this keeps the connection private and allows localhost addresses. Use a Global Tool Server when hosting a tool for multiple users; in that case the backend must be able to reach the server. Remember that each tool route must be added separately; connecting only the root URL will fail because mcpo mounts tools on distinct paths.
In my experience the combination of mcpo and Open WebUI makes connecting to external MCP servers almost effortless. Start the proxy, copy the generated URL into the Open WebUI settings, and the new tool appears in your chat interface with auto‑generated documentation. For remote servers, ensure the host and authentication headers are configured correctly, mcpo supports bearer tokens and custom headers for connecting to streamable‑HTTP servers.
Develop own MCP server + Tools / Resources
Developing an MCP server is less about infrastructure and more about how you describe the functions you expose. The official Python SDK (maintained under the ModelContextProtocol organisation) provides a FastMCP class that simplifies server creation. But there are also other SDKs available for all major languages.

You can find all resources about developing your own MCP server on the official docs: Build an MCP Server - Model Context Protocol or use the repositories of the SDKs for insights as that was the most straight forward way of getting a server running for me. So for me using python this was the most valuable page: modelcontextprotocol/python-sdk
To give you some Ideas I created a small server wich I connected to help me do my presentation :) The Idea was that I can speak to the connected LLM and via the MCP it will understand the task of pressing the “n” button to go to a new slide.
from mcp.server.fastmcp import FastMCP
from pynput.keyboard import Key, Controller
import time

# Initialize the FastMCP server
mcp = FastMCP("LazyPresentator")

# Create a keyboard controller instance
keyboard = Controller()

@mcp.tool()
def press_n_key(delay_seconds: int = 5) -> str:
    """
    For lazy presentators: Automatically presses the 'n' key to advance to the next slide
    after a specified delay.

    This is perfect for presentators who are too lazy to press the 'n' key themselves.
    The default delay gives you time to finish speaking before advancing.

    Args:
        delay_seconds: Number of seconds to wait before pressing the 'n' key (default: 2)

    Returns:
        A confirmation message about the slide advancement.
    """
    try:
        # Press and release the 'n' key
        time.sleep(delay_seconds)
        keyboard.press('n')
        keyboard.release('n')

        # Add a small delay to ensure the keypress is registered
        time.sleep(0.1)

        return "Successfully pressed the 'n' key. Screen should be blanked/unblanked if in presentation mode."

    except Exception as e:
        return f"Error pressing 'n' key: {str(e)}"


if __name__ == "__main__":
    mcp.run()
we can now simply run this via:
mcpo --port 8000 -- python .\lazy_presentator.pyYou should see something like this in your terminal:

And when connected to your Open WebUI instance as described above you should now see this symbol indicating the connection to the MCP server is established and tools are available:

Now we can test the tool we just created
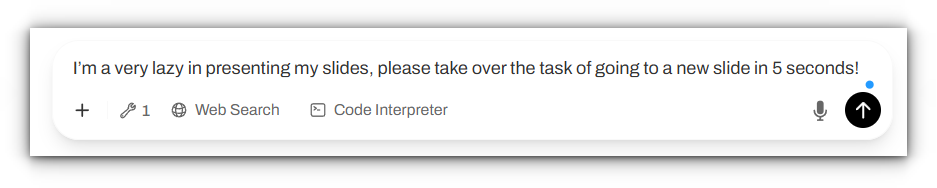
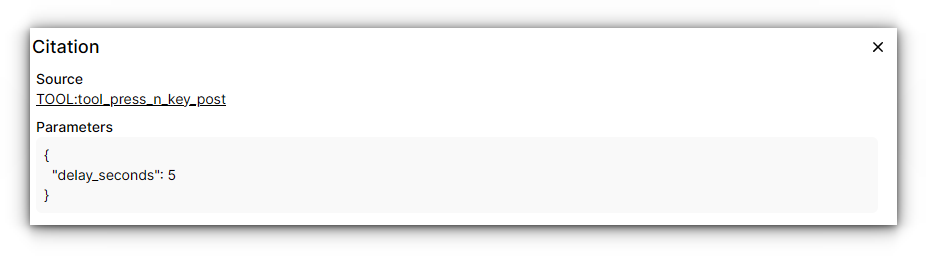
We can check if the tool was used and if parameters were set correctly via pressing on the text “TOOL:tool_press_n_key_post” in the models reply. We will see the following, correctly executed task:
What to focus on when developing your MCP tools
Setting up an MCP server is technically straightforward, but making it genuinely useful for a language model requires a different kind of effort. The real work isn’t in the code that runs the server, but in the clarity and quality of the descriptions you provide for your tools. LLMs, especially smaller local models, don’t “think” outside the box; they match the user’s request to the text you provide in your tool’s docstring. Here’s what to focus on to avoid common pitfalls.
1. The Art of the Tool Description ✍️
Your tool’s docstring is not just documentation for a human; it’s the primary prompt for the model. It must be explicit, comprehensive, and unambiguous. A poorly described tool will never be used, no matter how powerful it is.
- Be explicit about the purpose. Don’t just name the tool; explain what it achieves. Instead of
"""Manages files.""", use"""Creates, deletes, or modifies files on the local filesystem. Use this tool when a user wants to write text to a new file or edit an existing one.""" - Detail every parameter. Clearly define what each argument is, its expected data type (e.g., string, integer), and its format. If a parameter has a default value, state it. For example:
Args: filename (str): The full path to the file to be created. content (str): The text content to write into the file. - Give concrete examples. The most effective way to guide the model is to show it examples of when the tool should be used. This helps it recognize user intent. You can even add this directly to the description:
For example, if the user says 'save this summary to a file named report.txt', this is the right tool to use.
Think of it as an iterative process of prompt engineering. Your first description will likely be inadequate. The key is to test, observe how the model fails, and refine the description to cover the gaps.
Ultimately, building effective MCP tools is a user-centric design process where the “user” is the language model itself. Your job is to provide it with a perfect set of instructions so it can, in turn, perfectly serve the human user.
Some thoughts on the ecosysthem of MCP
The Model Context Protocol is more than just a clever idea, it’s rapidly becoming a foundational standard for a new generation of AI-powered applications. Its true power lies in creating a composable and interoperable ecosystem where tools and AI hosts can be mixed and matched freely. The goal is to move beyond custom, one-off integrations and towards a universal “USB port” for AI.
Who is Adopting MCP?
The momentum behind MCP is growing, with key players across the industry integrating it into their products.
- AI Hosts (Clients): The applications that users interact with are the primary drivers of MCP. Besides Open WebUI, which has embraced MCP for local tool use, the protocol was introduced by Anthropic for its Claude models. AI-native development environments like Cursor also leverage similar principles to connect models to your codebase, and we can expect to see more native support in IDEs and operating systems.
- Tool Providers (Servers): This is where the ecosystem is truly exploding, moving far beyond early adopters. The most significant impact is now seen in critical infrastructure and data platforms. HashiCorp, for instance, has released an official MCP provider for Terraform. This allows a model, with human oversight, to interpret a request like “provision a new staging environment with two web servers and a load balancer” and generate and apply the corresponding infrastructure plan. The protocol’s built-in requirement for user confirmation makes it a secure way to delegate complex DevOps tasks.
- Developer and Data Ecosystems: The community has rapidly built MCP servers for indispensable developer tools. There are now popular open-source MCP wrappers for the GitHub Actions API, enabling an AI assistant to report on CI/CD pipeline failures or trigger a deployment. In the data world, major data cloud platforms like Snowflake have introduced native MCP integrations. This allows analysts to ask complex questions in natural language, such as “Generate a report of Q2 customer acquisition costs grouped by marketing channel,” which the model translates into a precise SQL query, executes, and summarizes, democratizing data access like never before. These integrations show MCP becoming the standard API layer for AI, bridging the gap between human intent and complex digital systems.
Why It’s Time to Get Onboard
For developers, MCP represents a significant opportunity. Instead of building a bespoke web interface or a proprietary plugin system for your application, you can expose its functionality through an MCP server. This has several advantages:
- Future-Proofing: By building on an open standard, your application instantly becomes compatible with any AI host that supports MCP, now and in the future.
- Increased Reach: Users can integrate your tool into their preferred AI workspace, whether it’s Open WebUI, a VS Code extension, or another host. You provide the capability, they choose the interface.
- Focus on Core Logic: You can stop worrying about building and maintaining a complex UI for every possible action. Instead, you can focus on what your application does best and expose that logic through well-described tools.
The ecosystem is still young, but the trajectory is clear. MCP is poised to become the standard way for AI models to safely and effectively interact with the outside world. Getting familiar with it today means you’ll be ready to build the next wave of integrated, AI-powered applications tomorrow.